Day 29 - 邁向 DevOps 之路 (2)
本日共賞
- 使用 Container Image Repository
- 建立 CI/CD Pipeline
- 部署 k8s
希望你知道
- DevOps
- CI/CD
- 邁向 DevOps 之路 (1)
昨天我們在 ithome 叢集上安裝了 Jenkins,今天我們來實作一下簡易版的自動部署。
使用 Container Image Repository
當開發工作完成之後,我們會利用 github 或 bitbucket 這類的 Code Repository 來保存原始檔案,當 Jenkin 接收到 Code Repository 更新的訊息時 (例如:push),Jenkins 會把 Code Repository 上最新的內容下載並打包成映像檔,最後上傳到 Image Repository。為了完成這些動作,我們需要
CI/CD 工具:邁向 DevOps 之路 (1)已經安裝 JenkinsCode Repository:這次我們使用 github 當作示範。Image Repository:這次我們使用 google 的 Container Registry 服務當作示範
請注意,若需要使用私有庫 (private repository) 可能需要付費。你可以考慮使用 bitbucket,因為五人以下的專案可以是不公開的。另外 Container Registry 也是要付錢的,一樣算在 300 美金的額度裡
首先,在 github 建立一個專案,名稱為 ironman2018-cicd
名稱可自取
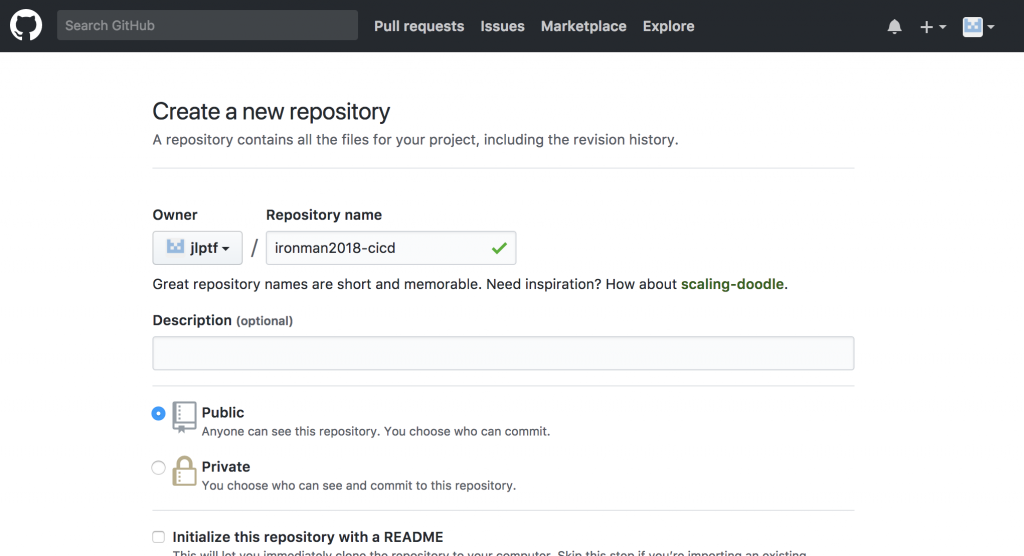
然後複製下來,名稱請換成你的
這個步驟可以在你自己的本機端操作
$ git clone git@github.com:jlptf/ironman2018-cicd.git; cd ironman2018-cicd
Cloning into 'ironman2018-cicd'...
warning: You appear to have cloned an empty repository.
Checking connectivity... done.
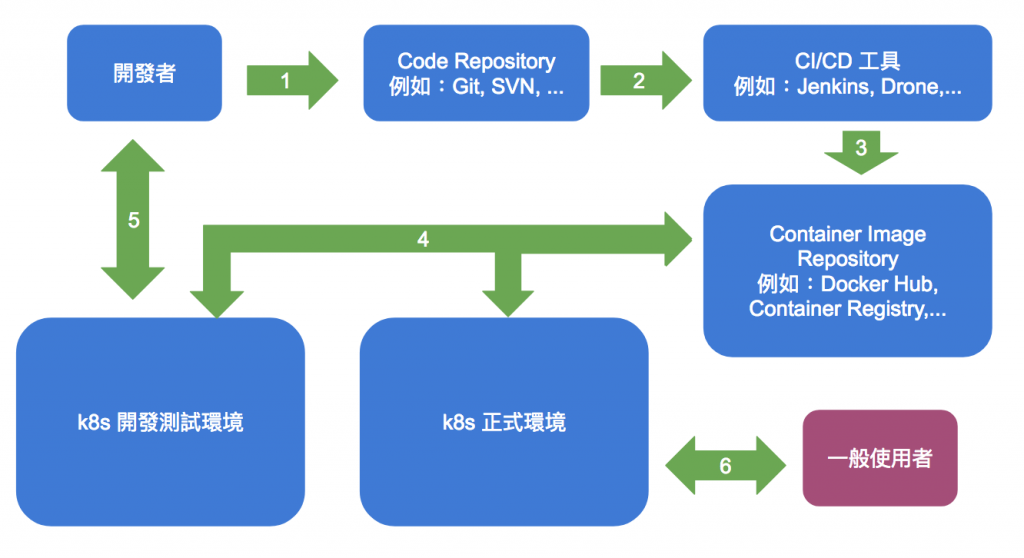
接下來,我們加兩個檔案來打通上圖的步驟三 CI/CD 工具 => Container Image Repository,分別是 Jenkinsfile 與 Dockerfile,內容如下
Jenkinsfile 是用來處理 Jenkins Pipeline 的工作。
Dockerfile 則是用來建立映像檔
# Jenkinsfile
node{
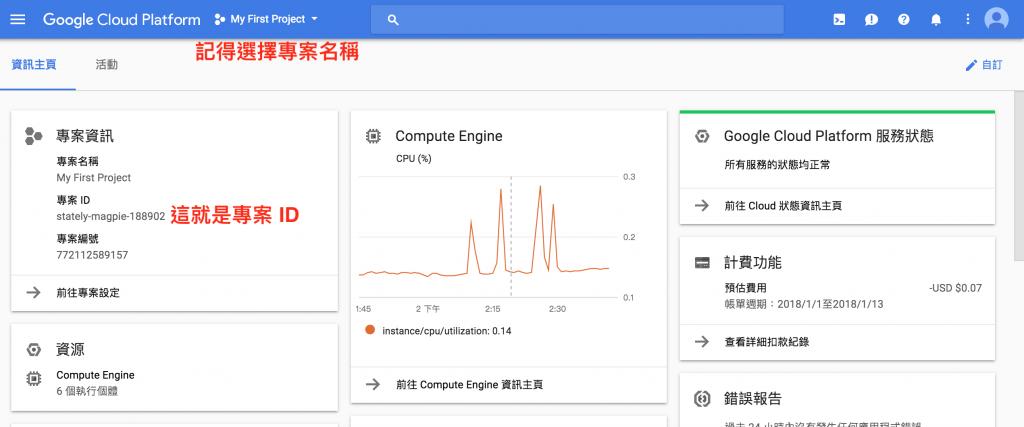
def project = 'stately-magpie-188902'
def appName = 'ithome'
def tag = "v_${env.BUILD_NUMBER}"
def img = "gcr.io/${project}/${appName}-${env.BRANCH_NAME}"
def imgWithTag = "${img}:${tag}"
checkout scm
stage '建立映像檔'
sh("docker build -t ${imgWithTag} .")
stage '放置映像檔'
sh("gcloud docker -- push ${imgWithTag} ")
}
# Dockerfile
FROM nginx
def project:專案 ID,可以在 console 的首頁裡面找到,請替換成你自己的專案 ID
關於 Jenkinsfile 的內容:
def appName:名稱可自訂,該名稱會用來建立映像檔的路徑def tag:每次打包,取得該次的編號當作映像檔的 tagdef img:組合 Container Registry 的路徑def imgWithTag:Docker 映像檔名稱,包含 tagcheckout scm:取得原始碼 (source code)stage '建立映像檔':在這個步驟裡,打包 Docker 映像檔stage '放置映像檔':將打包後的映像檔上傳至 Container Registry
所以,根據 Jenkinsfile 的描述,當 Jenkins 偵測到原始檔有變化時,會先嘗試著建立 Docker 映像檔,然後再將該映像檔上傳至 Container Registry,聰明的你應該能想像到這個映像檔之後就會被 k8s 所使用吧!
完成後把上面兩個檔案上傳到 github
$ git add .
$ git commit -m "add Jenkinsfile and Dockerfile"
[master (root-commit) ad82740] add Jenkinsfile and Dockerfile
 2 files changed, 14 insertions(+)
 create mode 100644 Dockerfile
 create mode 100644 Jenkinsfile

$ git push
Counting objects: 4, done.
Delta compression using up to 4 threads.
Compressing objects: 100% (3/3), done.
Writing objects: 100% (4/4), 516 bytes | 0 bytes/s, done.
Total 4 (delta 0), reused 0 (delta 0)
To git@github.com:jlptf/ironman2018-cicd.git
 * [new branch]      master -> master
建立 CI/CD Pipeline
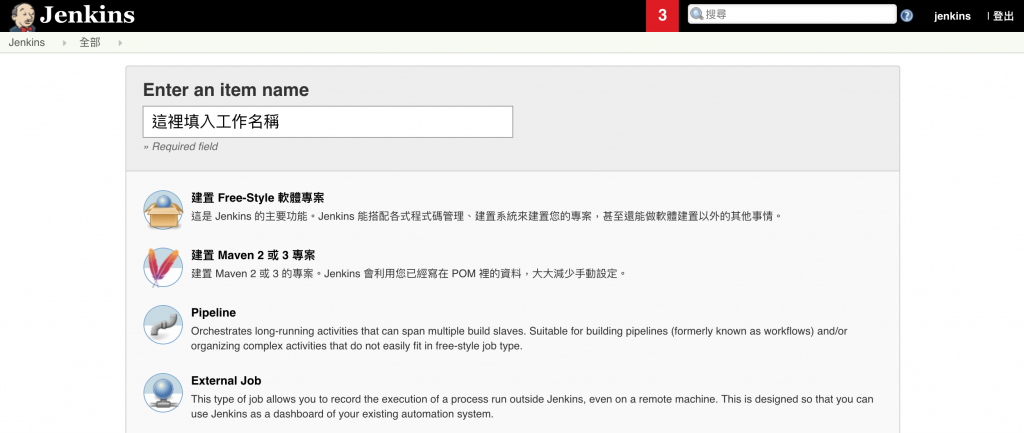
登入 Jenkins 後,新增一個作業
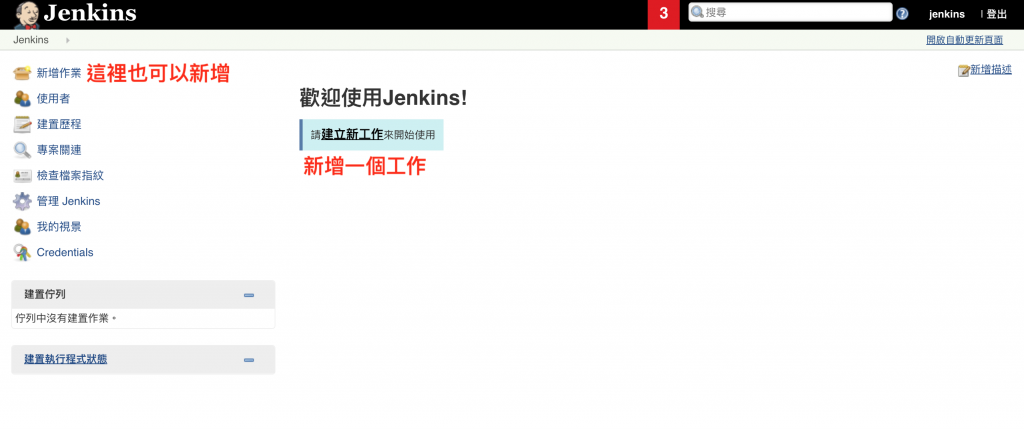
給定一個名稱後 (這裡設為 cicd,可自取),
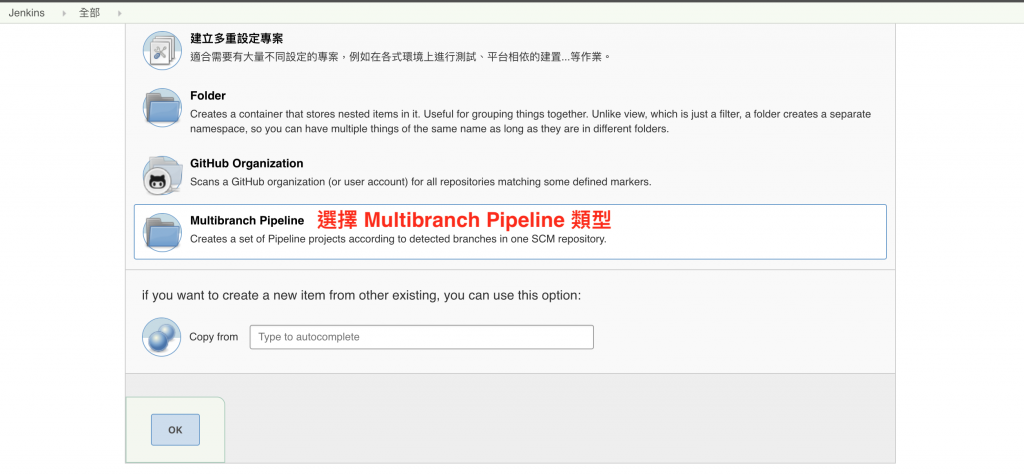
選擇 Multibranch Pipeline 類型並建立
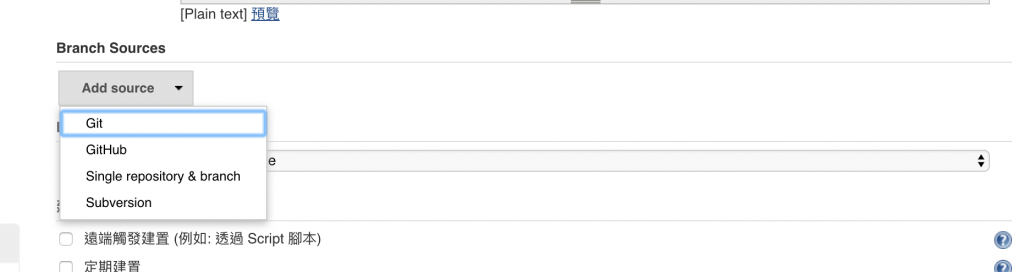
接下來設定一下原始碼的位置,請在 Branch Sources 點選 Add source 然後選擇 Git
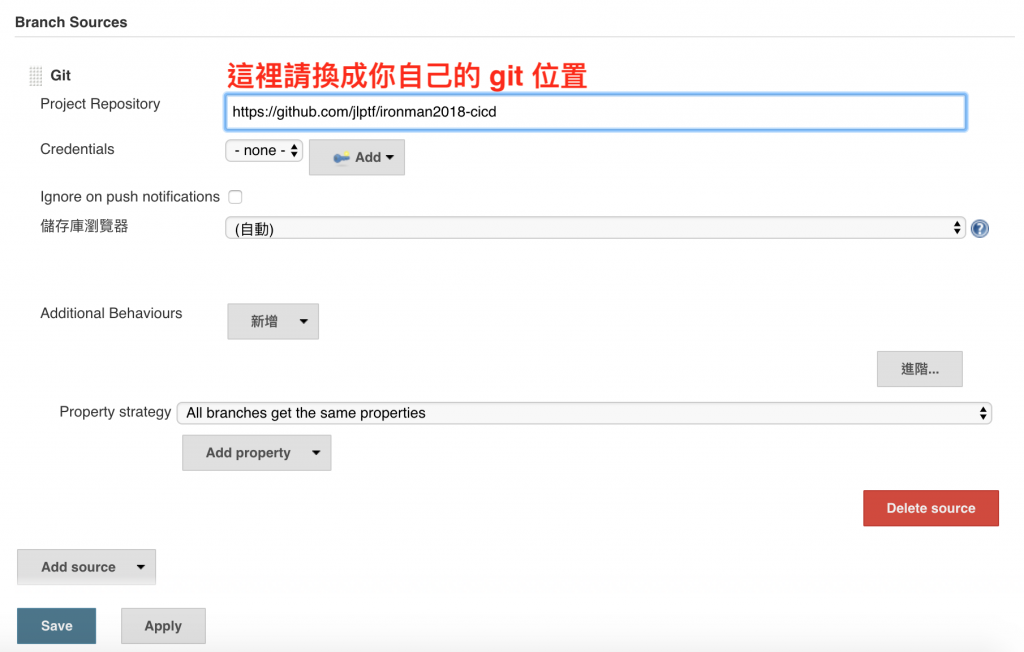
然後把剛剛建立的 git (https://github.com/jlptf/ironman2018-cicd) 填入
然後設定一下建置原則,這裡為了方便起見,我們把它調整為一分鐘偵測一次,即每分鐘 Jenkins 都會去檢查 git (https://github.com/jlptf/ironman2018-cicd) 上是否有發生變化,如果有則執行工作。
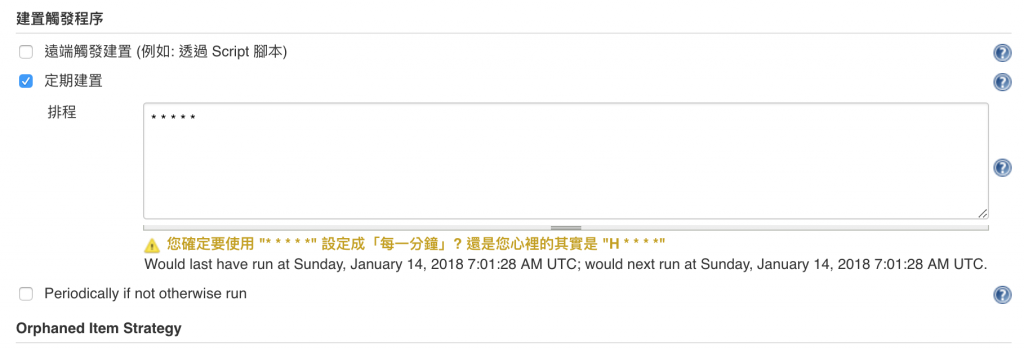
在 建置觸發程序 裡選擇 定期建置 並填入 ‘* * * * *’ 表示每分鐘偵測一次,完成後儲存。
接著 Jenkins 就會做嘗試性的建置,正當以為一切都順利的時候,你會發現
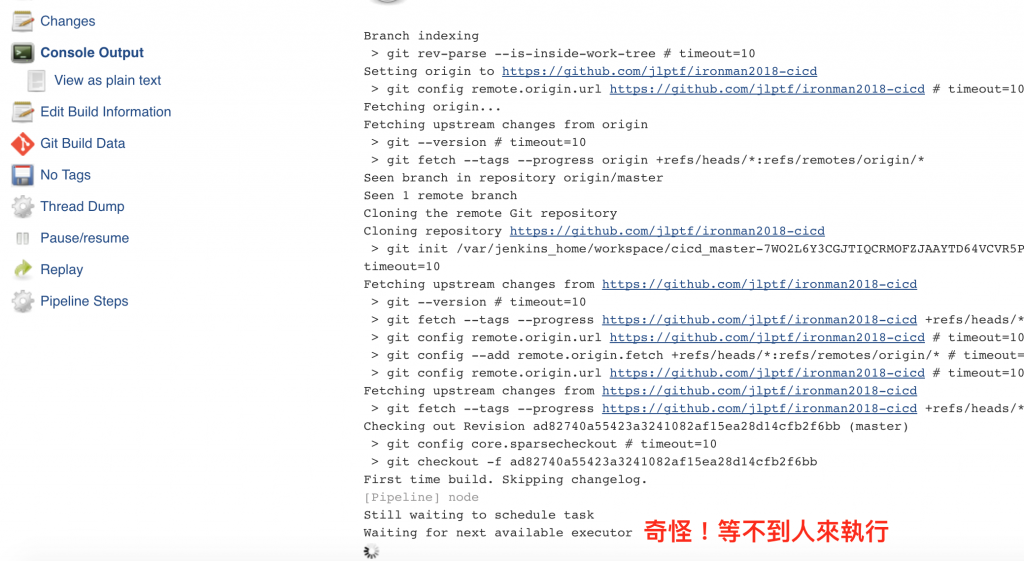
Waiting for next available executor 顯示一直無法等到 Jenkins 來服務,事情一定沒這麼單純,於是檢查一下 Jenkins Pod 的 log 你會發現
$ kubectl logs jenkins-576b94cf98-kj87l -n jenkins
...
Message: Forbidden!Configured service account doesn't have access.
...
找到原因了,原來是 service account 無法存取 k8s,還記得我們在 Day 19 - 老闆!我可以做什麼:RBAC 提到過的權限嗎? 1.8版後,引進的 RBAC 需要我們指定每個角色能夠操作的權限,而當 jenkins 這個命名空間被建立時,同時會建立一個 default 的 service account,但是我們並沒有替這個 default 分配權限。
為什麼需要權限?因為 Google 提供的這個映像檔所使用的 Jenkins 會在 k8s 中建立一個 slave Pod 來處理工作,而在 k8s 建立 Pod 這個動作就需要被允許
所以,我們可以透過下列指令分配權限給 default
$ kubectl create clusterrolebinding jenkins-admin \
--clusterrole=admin \
--serviceaccount=jenkins:default
clusterrolebinding "jenkins-admin" created
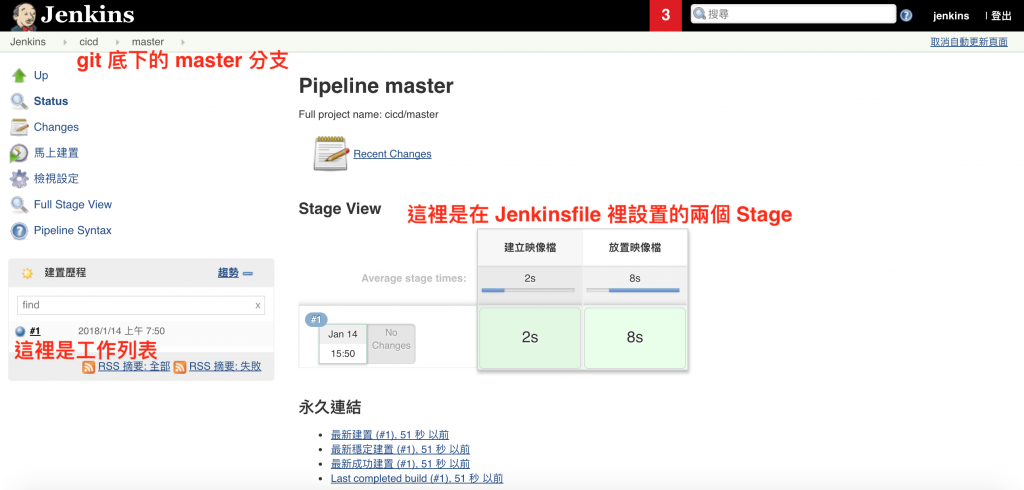
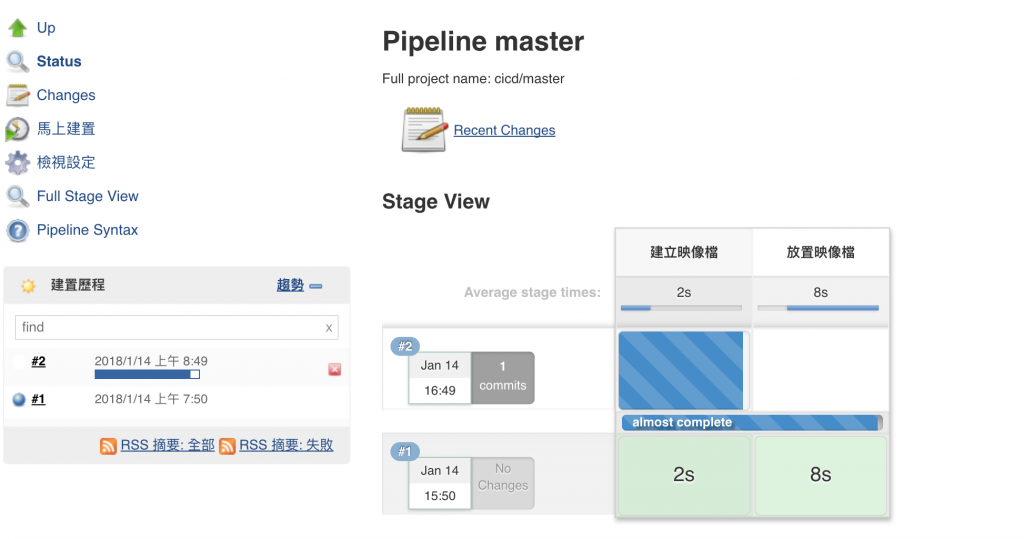
這時候你再回去看 log,就會發現一切都正常運作了。你可以從 cicd 裡的 master 看到已完成的工作 1
,也可以看到在 Jenkinsfile 內配置的兩個 Stage 即 建立映像檔 與 放置映像檔
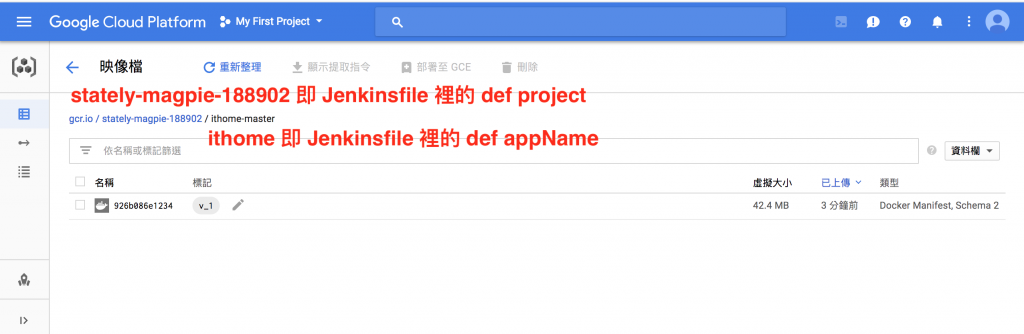
你可以到 console,然後從左邊的目錄找 Container Registry,你就會找到剛剛建立的映像檔。
這樣從 開發 (1)=> Code Repository (2)=> CI/CD 工具 (3)=> Image Repository 都成功打通了!
部署 k8s
接下來,我們要在每次建立映像檔後,更新 k8s 的內容,讓我們先建立兩個命名空間 develop 與 production 分別表示開發環境與正式環境
$ kubectl create namespace develop
namespace "develop" created

$kubectl create namespace production
namespace "production" created
我們將 master 分支當成開發環境,即內容會部署到 develop 中,我們先建立一個 k8s 資料夾,並新增以下三個檔案
# deploy.yaml

---
apiVersion: extensions/v1beta1
kind: Deployment
metadata:
  name: ithome
spec:
  replicas: 1
  template:
    metadata:
      name: ithome
      labels:
        app: ithome
        env: current   <=== 我們會在 Jenkins 裡替換成對應的環境
    spec:
      containers:
      - name: ithome
        image: gcr.io/ithome-image   <=== 我們會在 Jenkins 裡替換成對應的映像檔
        resources:
          limits:
            memory: 0
            cpu: 0
        imagePullPolicy: Always
        ports:
        - containerPort: 80
          protocol: TCP
      restartPolicy: Always

# service.yaml

---
apiVersion: v1
kind: Service
metadata:
  name: ithome
spec:
  ports:
  - name: http
    port: 80
    protocol: TCP
  type: NodePort
  selector:
    app: ithome
    env: current   <=== 我們會在 Jenkins 裡替換成對應的環境

# ingress.dev.yaml   <=== 開發環境所使用的 ingress

---
apiVersion: extensions/v1beta1
kind: Ingress
metadata:
  name: ithome-ingress
  namespace: develop
spec:
  backend:
    serviceName: ithome
    servicePort: 80
其中
env: current:我們會在 Jenkins 裡處理,根據分支來決定要放在測試環境env: develop或正式環境env: productionimage: gcr.io/ithome-image:每一次程式碼變更後,映像檔會重新製作並放置到 Container Registry 中,因此,Jenkins 會把正確的映像檔名稱替換掉
<=== 這時候你的專案應該會有以下內容

- Jenkinsfile
- Dockerfile
- k8s /
       deploy.yaml
       ingress.dev.yaml
       service.yaml
由於 Ingress 不需要每次變更,因此我們可以先把 Ingress 部署到 ithome 叢集內
你也可以在 Jenkinsfile 裡一併處理
$ kubectl apply -f ./k8s/ingress.dev.yaml
ingress "ithome-ingress" created
最後,修改一下 Jenkinsfile,加入新的 Stage: 部署
# Jenkinsfile

node{
    def project = 'stately-magpie-188902'
    def appName = 'ithome'
    def tag = "v_${env.BUILD_NUMBER}"
    def img = "gcr.io/${project}/${appName}-${env.BRANCH_NAME}"
    def imgWithTag = "${img}:${tag}"

    def devNamespace = 'develop'
    def proNamespace = 'production'

    checkout scm

    stage '建立映像檔'
    sh("docker build -t ${imgWithTag} .")

    stage '放置映像檔'
    sh("gcloud docker -- push ${imgWithTag} ")

    stage '部署'
    // replace as new image
    sh("sed -i.bak 's#gcr.io/ithome-image#${imgWithTag}#' ./k8s/deploy.yaml")
    switch (env.BRANCH_NAME) {
      case "master":
        // replace namespace settings
        sh("sed -i.bak 's#env: current#env: ${devNamespace}#' ./k8s/service.yaml")
        sh("sed -i.bak 's#env: current#env: ${devNamespace}#' ./k8s/deploy.yaml")
        sh("kubectl --namespace=${devNamespace} apply -f ./k8s/service.yaml")
        sh("kubectl --namespace=${devNamespace} apply -f ./k8s/deploy.yaml")
        break
    }
}
在這裡我們會把 master 分支當成 develop 環境,因此,當判定為 master 分支時必須重新處理 yaml 檔案內容,最後再部署到 ithome 叢集中。一切就緒之後,就可以 push 到 github。
這裡是為了方便示範故沒有套用任何分支架構,你可以參考 Git Flow 或 Github Flow 等等不同的分支架構
$ git add .
$ git commit -m "apply k8s settings"
$ git push
這時候再回去觀察 Jenkins,你就會發現新工作開始啟動
完成之後,透過指令可以發現 develop 上有新的 Pod 與 Service 正在運行
$ kubectl get pods -n develop
NAME READY STATUS RESTARTS AGE
ithome-84567cdc7d-t57jl 1/1 Running 0 53s
$ kubectl get service -n develop
NAME TYPE CLUSTER-IP EXTERNAL-IP PORT(S) AGE
ithome NodePort 10.59.253.12 <none> 80:30561/TCP 1m
$ kubectl get ingress -n develop
NAME HOSTS ADDRESS PORTS AGE
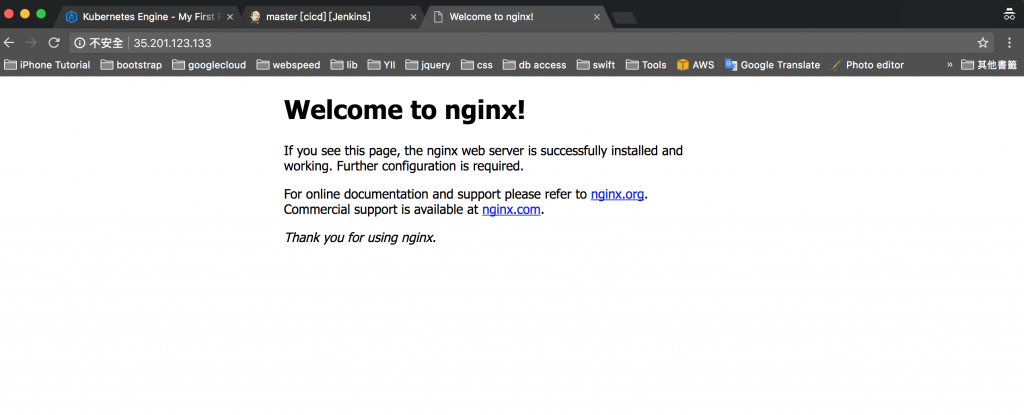
ithome-ingress * 35.201.123.133 80 10m
接下來你知道該怎麼做了吧!!當然是去看看 http://35.201.123.133 有沒有 nginx 在運作瞜!
如何?沒欺騙你吧!恭喜你,架構圖中 開發者 (5)=> 開發測試環境, CI/CD 工具 (4)=> k8s 叢集 以及 k8s 叢集 (6)=> 使用者 的環節已經被你打通了!明天我們會把叢集內開發環境與正式環境建置完成。
本文與部署檔案同步發表於 https://jlptf.github.io/ironman2018-day29